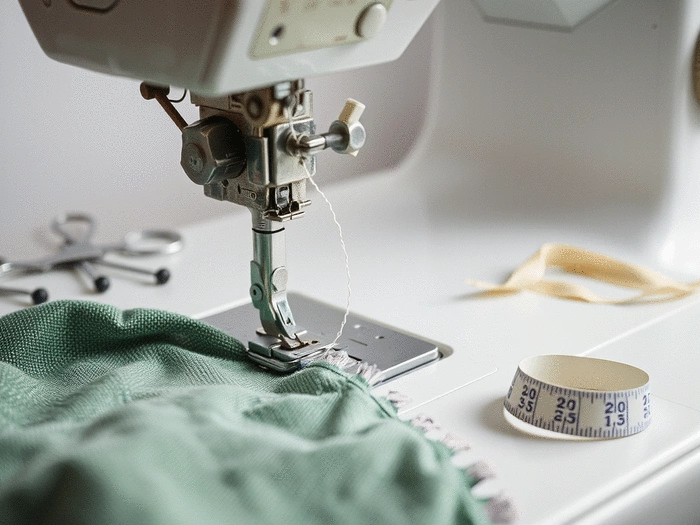
The success of your sewing projects often hinges on one critical aspect: the tension in your threads. Did you know that improper tension can lead to frustrating looping issues, potentially derailing your entire project? Let’s delve into the essential insights to help you navigate these common challenges and elevate your tufting skills!
What You Will Learn
Understanding the significance of upper and lower thread tension in preventing loops pulling out of fabric.
Identifying common threading mistakes that can lead to stitching issues and how to avoid them.
Key maintenance practices for your sewing machine to ensure consistent performance, such as cleaning lint and checking the bobbin case.
The impact of different fabric types on stitch quality and how to choose the right fabric for your projects.
Key Factors Affecting Loops Pulling Out of Fabric and Troubleshooting Guide
Addressing the common issue of loops pulling out of fabric involves understanding several key areas, from machine tension to fabric properties and proper maintenance. The visual below outlines the primary causes and offers a quick reference for troubleshooting.
Thread & Tension Management
Properly balanced upper and lower tension is crucial for smooth, even stitches. Imbalance leads to loops or puckering.
Upper Tension: Too tight/loose affects stitch length.
Lower Tension: Imbalance causes loops on underside.
Troubleshooting: Adjust both upper and lower tension. Test on scrap fabric.
Threading Accuracy & Common Errors
Incorrect threading often causes immediate looping or skipped stitches, disrupting stitch formation.
Presser Foot: Must be up when threading to engage tension discs.
Thread Path: Follow machine's diagram precisely.
Troubleshooting: Rethread completely with presser foot up. Check all guides.
Machine Maintenance & Components
Regular cleaning and component checks prevent mechanical issues that lead to loops.
Lint/Debris: Clean from tension discs and bobbin area.
Needle Wear: Replace dull/bent needles; use correct type for fabric.
Fabric type significantly impacts stitch behavior; choose wisely to avoid issues.
Fabric Weight: Adjust tension for heavy vs. light fabrics.
Stretchiness: Requires specific needles/thread to prevent added tension.
Troubleshooting: Match fabric to project; adjust settings for weight/stretch.
Understanding the Causes of Loops Pulling Out of Fabric
When diving into the world of sewing, many of us encounter the frustrating issue of loops pulling out of fabric. As a DIY enthusiast and tufting expert, I’ve seen this problem arise time and again, often leading to unfinished projects and disappointment. But fear not! In this section, we'll explore the various causes of this issue, so you can tackle it head-on and achieve the beautiful results you desire.
Loops pulling out can stem from several factors, including thread tension, threading mistakes, and the type of fabric used. It’s crucial to understand these causes to make informed adjustments. For those just starting their journey, understanding tufting kits basics can provide a solid foundation. Let’s get started with the impact of thread tension!
The Role of Tension in Thread Loops
In tufting, just like in sewing, tension plays a vital role in ensuring that your stitching is smooth and even. Properly balanced upper and lower tension is essential for creating a high-quality finish on your projects. If the tension is too tight or too loose, you may find that loops start to pull out, leading to uneven stitching.
Upper Tension: This is the tension applied to the thread coming from the spool. If it's too tight, your stitches can be too short, while too loose can lead to longer, messy stitches.
Lower Tension: This refers to the tension of the bobbin thread. It is equally important; an imbalance here can cause loops to form on the underside of your fabric.
Getting these tensions just right is crucial for smooth stitching. If you encounter issues, it’s essential to check both upper and lower tension settings to ensure they are in harmony.
How Upper and Lower Tension Affect Stitch Quality
As you work on your tufting projects, pay attention to how your machine responds to different tension settings. Too much upper tension may pull the fabric down tightly, while too little can leave your stitches hanging loose. Finding the sweet spot can really enhance your stitch quality!
Remember, the goal is to have stitches that look good on both sides of the fabric. Regularly checking and adjusting these settings can save you a lot of headaches down the line.
Identifying Tension Discrepancies and Their Impact
Sometimes, it’s not immediately obvious that tension is the culprit behind loops pulling out. Look for signs such as uneven stitching or fabric puckering. These can be indicators that your tension settings need adjustment. Keeping a close eye on your projects will help you catch these discrepancies before they lead to a significant issue!
It's worth investing a little time to test your tension settings on scrap pieces of fabric. This practice can save you from future frustrations when working on your actual projects.
Threading Mistakes That Lead to Looping Issues
Another common culprit of loops pulling out is threading mistakes. I know firsthand how easy it is to overlook this step, especially when you’re eager to get started on your latest tufting project. However, proper threading is essential for smooth operation!
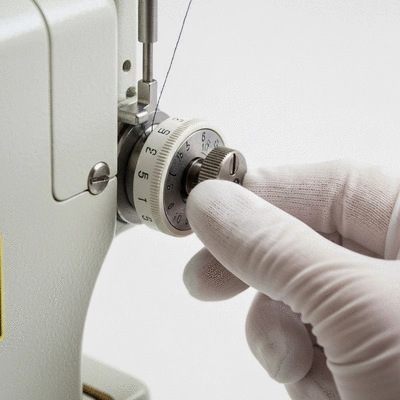
Rethreading with the Presser Foot Up: Always make sure your presser foot is raised while threading. This helps the tension discs to engage properly, ensuring the right tension throughout your stitching.
Common Thread Path Errors: Ensure that your thread is following the correct path through your machine. A misplaced thread can easily lead to looping issues.
Taking a moment to double-check your threading can save you a lot of time and frustration while you work on your beautiful creations! For more detailed guidance, consider exploring tufting speed and pressure tips to optimize your workflow.
Importance of Rethreading with the Presser Foot Up
Here’s a quick tip: if you ever have to rethread your machine, always lift that presser foot! When the presser foot is up, it releases the tension discs and ensures the thread can seat itself properly.
This small step can make a big difference in the quality of your stitches. Trust me, I’ve learned this the hard way!
Common Thread Path Errors to Avoid
Pay close attention to your machine’s threading diagram, which outlines the correct path for the thread. It’s easy to miss a step or thread it incorrectly, which can lead to those pesky loops pulling out.
A little diligence during this stage can help you avoid major headaches later on. Remember, the more familiar you become with your machine, the smoother your crafting journeys will be!
Mechanical and Maintenance Factors to Consider
Let’s not forget about the mechanical aspects of sewing that can contribute to loops pulling out. Proper maintenance of your machine is essential to keep things running smoothly!
Cleaning Lint and Debris: Regularly clean out the lint and debris from the tension discs and other parts of your sewing machine. This can prevent thread snagging and looping.
Assessing the Bobbin Case: Ensure that the bobbin case is functioning correctly and that the bobbin is wound evenly.
Recognizing Needle Wear: Over time, needles can become dull or bent. Using the right needle for your fabric type can significantly help in preventing loops.
By keeping your machine well-maintained, you’ll not only reduce the chances of threading issues but also extend the life of your equipment.
Cleaning Lint and Debris from Tension Discs
Cleaning your machine might seem like a chore, but it’s a vital step in preventing looping issues. I recommend making this part of your routine, especially after heavy use!
Using a soft brush to gently remove lint will ensure that your tension discs are clear, allowing for smoother stitching. A clean machine means fewer frustrations down the line!
Assessing the Bobbin Case for Proper Function
Another critical aspect of machine maintenance is checking your bobbin case. If it’s not functioning correctly, you may encounter looping problems. Ensure that the bobbin is inserted correctly and that the case is free of debris.
Regular checks here can help you catch problems early, so you can enjoy a seamless stitching experience.
Recognizing Needle Wear or Incompatibility
Finally, always keep an eye on the condition of your needle. A worn or incompatible needle can lead to all sorts of issues, including loops pulling out. If you notice any bends or dullness, it’s time to replace it.
Choosing the right needle type for your fabric is also crucial. For instance, using a universal needle for knits might not yield the best results. Always match your needle to your project to ensure optimal stitching!
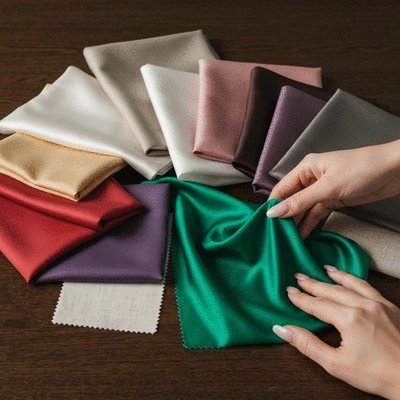
Understanding Fabric Types and Their Impact on Looping
The type of fabric you choose can significantly influence how your stitches behave. Some fabrics are more forgiving than others when it comes to tension and looping issues.
Fabric Weight: Heavier fabrics may require higher tension, while lighter fabrics often need less. Understanding your fabric will help you adjust your tension settings accordingly!
Stretchiness: Fabrics with stretch can create added tension, leading to loops if not handled properly. Choosing the right needle and thread will also make a difference.
As you embark on your tufting journey, take time to familiarize yourself with the characteristics of different fabrics. It will pay off immensely in stitch quality!
How Fabric Weight and Stretch Influence Stitch Quality
When working with fabric, always consider its weight and stretch. If you’re using a lightweight fabric, you may need to decrease the tension, while heavier fabrics might need an increase.
Experimenting with different fabric types can help you understand their unique behaviors, leading to better results in your projects!
Choosing the Right Fabric for Your Project to Avoid Loops
Before you start any project, make sure to select a fabric that complements your design and technique. Not all fabrics are created equal, and some will perform better than others during the tufting process.
Taking the time to choose the right fabric will minimize the risk of looping issues and help you create stunning rugs that you’ll be proud to show off!
Pro Tip
To prevent loops from pulling out of your fabric, always test your tension settings on a scrap piece before starting your main project. This simple practice can save you time and frustration, ensuring that your stitching is perfect from the very first stitch!
Frequently Asked Questions About Loops Pulling Out of Fabric
1. What causes loops to pull out of fabric in tufting?
Loops pulling out of fabric are primarily caused by incorrect thread tension (both upper and lower), threading mistakes, insufficient machine maintenance (like lint buildup or worn needles), and incompatible fabric types for your project.
2. How do I fix upper and lower thread tension issues?
To fix tension issues, you need to adjust both the upper and lower tension settings on your machine. Test on a scrap piece of fabric to find the balanced "sweet spot" where stitches look even on both sides. Too tight upper tension can shorten stitches, while too loose can make them messy. Imbalanced lower tension often causes loops on the fabric's underside.
3. Why is it important to rethread with the presser foot up?
Rethreading with the presser foot up is crucial because it releases the tension discs, allowing the thread to seat itself properly within them. If the presser foot is down, the tension discs remain engaged, preventing the thread from being correctly positioned, which can lead to looping and other stitch quality issues.
4. How does machine maintenance affect looping problems?
Regular machine maintenance is vital. Lint and debris buildup in tension discs or the bobbin area can obstruct thread flow and cause snagging or looping. A worn, dull, or bent needle can also lead to skipped stitches and loops. Ensuring the bobbin case functions correctly and the bobbin is wound evenly also prevents issues.
5. What role does fabric play in preventing loops?
Fabric type significantly impacts stitch behavior. Heavier fabrics usually require higher tension, while lighter ones need less. Stretchy fabrics can create additional tension, necessitating specific needles or thread types to prevent loops. Choosing the right fabric weight and type for your project and adjusting machine settings accordingly is key to avoiding looping issues.
Summarizing Key Insights for Troubleshooting Loops
As we wrap up our discussion on troubleshooting loops pulling out of fabric, it's essential to have a concise summary of the key insights we've covered. Addressing looping issues can feel daunting, but with the right strategies and knowledge, you can tackle these challenges head-on. Let's dive into some practical solutions and strategies to keep your projects running smoothly!
Quick Reference Troubleshooting Table
From Symptoms to Solutions: A Step-by-Step Guide
Symptoms
Possible Causes
Solutions
Loops are pulling out on the front
Incorrect tension settings
Adjust upper and lower tension accordingly
Skipped stitches
Incorrect needle size or type
Replace with the appropriate needle
Thread bunching underneath
Threading mistakes
Rethread machine with presser foot up
Fabric puckering
Improper fabric type
Choose compatible fabric for your project
This table serves as a handy reference to quickly identify and address common looping problems. If you encounter any of these symptoms, you can follow the suggested solutions to get back on track. Remember, practice makes perfect!
Final Thoughts on Maintaining Your Sewing Machine
Long-term Benefits of Preventive Care and Regular Checks
Maintaining your sewing machine is just as critical as the sewing itself! Regular checks and preventive care not only extend the life of your machine but also ensure consistent performance. Here are some key maintenance tips to keep your sewing machine in tip-top shape:
Clean lint and debris regularly from the machine.
Check and replace needles as needed.
Lubricate moving parts according to manufacturer instructions.
Inspect tension settings frequently for accuracy.
By following these steps, you can avoid many common issues related to sewing loops and keep your projects running smoothly. Trust me, your future self will thank you!
Encouragement for Continued Learning and Practice
Engaging with Sewing Communities for Shared Knowledge
As you continue your sewing journey, remember that learning doesn't stop here! Engaging with sewing communities can be a fantastic way to share knowledge, tips, and experiences. Whether it's through online forums, local sewing groups, or social media platforms, connecting with fellow enthusiasts can provide you with invaluable insights.
Resources for Further Learning and Support
To further enhance your sewing skills, I encourage you to explore various resources available to you. Here’s a list of places to check out:
Online tutorials and courses, like those offered at Tufting Kit Pro
Books focused on sewing techniques and troubleshooting
YouTube channels dedicated to sewing education
Local craft workshops and classes
With the right resources and a supportive community, you'll find yourself growing as a sewist in no time! I'm excited to see where your sewing adventures take you. Happy sewing, and keep creating beautiful things!
Recap of Key Points
Here is a quick recap of the important points discussed in the article:
Thread Tension: Ensure that both upper and lower tension settings are balanced to avoid loops pulling out.
Threading Properly: Always thread your machine with the presser foot up to engage the tension discs correctly.
Maintenance Matters: Regular cleaning and maintenance of your sewing machine can prevent threading issues and prolong its lifespan.
Fabric Choice: Understand the characteristics of different fabrics and adjust your tension accordingly to prevent loops.
Practice and Patience: Take time to practice on scrap fabric and learn from mistakes to improve your skills over time.
I'm Cassandra Flint, a **passionate DIY enthusiast** and *tufting expert* dedicated to helping you dive into the world of rug making. I share detailed tutorials, honest product reviews, and *curated recommendations* to help you **confidently create stunning home decor**. My goal is to empower you with the knowledge and tools you need to _transform yarn into art_ and **avoid common pitfalls**.
Beginner's Guide to Rug Tufting — Amazon Affiliate Banner